
My southern California urban garden suffers from lack of space and lack of sunlight. The only place where we get sun all day long is the sloped, concrete driveway. Our next door neighbor built a lovely sloped shelf on which he gardens in containers. That inspired me. But lacking his construction skills, I bought a kit for an elevated cedar planter box from Gardener’s Supply Company.
I have a cordless screwdriver among my bag of power tools. Because all old grannies need power tools, right? My kit arrived, and I was set. The delivery man dumped the big boxes on the front sidewalk, so I built the box right there. Why? Because the sidewalk is in the shade, and it gets hot in southern California. Also, because I have a bench on the front porch and at my age, I need to sit down a lot during these construction projects.
The planter box was really easy to assemble. Once it was done, I used those round plastic sliding-gliding things under the legs to move the box from sidewalk to driveway. I was able to do this all by myself, the assembly and moving. Not bad for a 73-yr-old granny recovering from recent cancer surgery!

Because our driveway slopes, I propped two legs of the box up on blocks to level the planter box. I added the boards for the bottom of the box and topped them with the included landscape fabric. At that point, I was ready for potting soil.

The directions say to use potting soil, not garden soil, because of weight. I added three big bags of Miracle Gro Moisture Control potting soil. By then, I was worn out, so I called my beloved spousal unit for reinforcements. He dumped in the other two bags of potting soil, and did the laborious task of digging out two plastic Tub Trugs (also from Gardeners Supply Company) of compost from our backyard com posters. Then the box was ready for planting!
I added transplants of yellow crookneck squash, yellow straight neck squash, orange bell pepper, Swiss chard, basil, and green onions. The green onions were ones I had grown myself from seed. I always have several bowls of green onions growing, and haven’t needed to buy green onions for many years.


Hmm, this bell pepper plant seems to have some ugly brown spots on it. But the new leaves look good. Who knows if any of these summer vegetables planted in August will actually produce anything. I do have hope for the yellow squash though, since there is already a lovely female bud on the crookneck squash plant.

Next, I planted seeds of Contender bush green beans, French Breakfast radishes, Detroit Red beets, and a mesclun mix with lettuces and arugula. All of those should grow and produce a crop in the time available to them. This is my greatest gardening joy, watching seeds sprout and grow.

The radish cotyledon leaves are heart-shaped, and the stem is red.

The beet cotyledon leaves are elongated, with deep red stems and a red streak on the cotyledon leaves.

This mesclun mix is supposed to be mostly lettuces, but at this stage, it seems to be mostly arugula. The arugula cotyledon leaves have a deep notch in them, while the lettuce cotyledon leaves are round.

Bean seeds arch up out of the ground, kind of dragging the cotyledon leaves after them. You can see the brown seed coat clinging to the head of the sprout.

Then the neck of the stem begins to straighten, lifting the cotyledon leaves up and out of the soil. The sprout is shedding its seed coat.
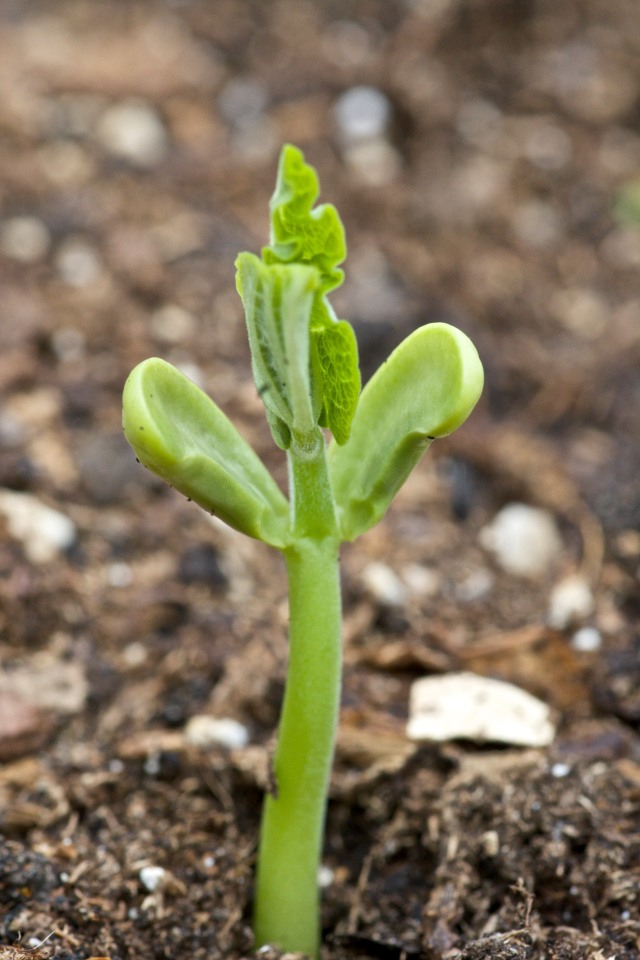
Then the thick cotyledon leaves open up, revealing the first true leaves.

Uh oh, there were a lot of butternut squash seeds in my compost. This is a volunteer squash seedling in front of the bean. Winter squash needs to be planted in May or June in order to bear fruit. But I just love these big, bold squash cotyledon leaves. I may leave a couple of volunteer butternuts at the back of the planter box. Why? Because I just love these big, bold squash sprouts. Maybe I will get a few male squash blossoms to put into scrambled eggs, who knows.
I hope you enjoy these pics of my new planter box and the seedlings as much as I enjoy watching these seedlings grow. Having them at waist height makes it possible for me to take closeups. My old knees don’t let me get down on the ground anymore. The closeups were taken with my Nikon D7100 and a Tokina 100 mm, f 2.8 macro lens.


Great little garden….no weeds!!!!!
LikeLike
You got all that stuff into one box? How often do you have to water it? I have a useless sloping concrete driveway facing south, too, but it gets shaded either morning or afternoon. So I might try this.
LikeLike
Excellent job Lou! Its amazing what us old gals can do when we want something done! Your photography is just beautiful and very inspiring!
LikeLike
Well, I just bought a 2×4 one with a snazzy trellis. I needed something to block the view of the trash cans. (It is illegal to be able to see them from the street here.) Also this will give me a sunny spot for vegetables in winter time. Grand idea you had!
LikeLike
I was eyeing the same planter box from Gardener’s Supply Company but have no where to locate it. Cannot leave it on the driveway, the first snow storm and the snow plow will totally destroy it, sigh!
I very much enjoyed this post, your close ups are amazing.
LikeLike
Where there’s a will there’s a way!
LikeLike